Techquest Daily

How to Host a Production ready WordPress Website on VPS (Step-by-Step with Nginx, PHP, and Cloudflare SSL)

Hosting Wordpress using Ubuntu VPS server

Launching a WordPress website on your own VPS gives you complete control, faster performance, and better security — all at a fraction of the cost of shared hosting.
In this guide, you’ll learn how to install and configure WordPress on a VPS using Nginx, PHP-FPM, MySQL, and Cloudflare SSL (Full Strict mode).

Why Host WordPress on a VPS?

A VPS (Virtual Private Server) gives you:

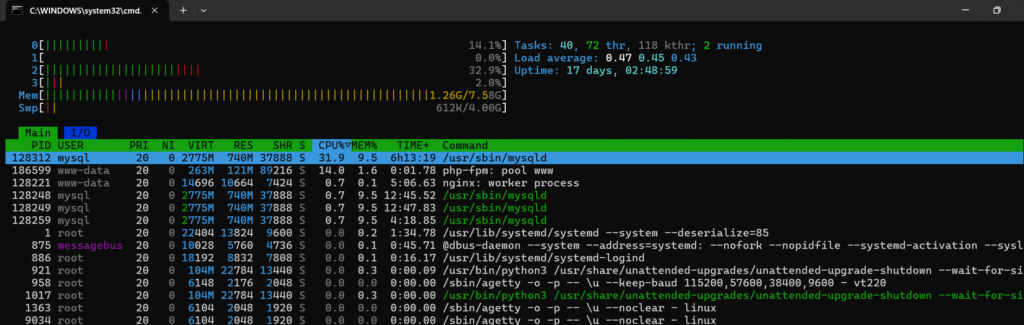
Fig: Running htop command to see consumption of RAM on Ubuntu VPS Server

Step 1: Prepare Your VPS

We’ll assume you’re using Ubuntu 22.04+ on a VPS from providers like AWS, DigitalOcean, Linode, or others.

Update and install essential packages:

sudo apt update && sudo apt upgrade -y
sudo apt install nginx mysql-server php-fpm php-mysql unzip curl -y

Start and enable services:

sudo systemctl enable --now nginx mysql php8.3-fpm

Step 2: Set Up the WordPress Database

Log in to MySQL:

sudo mysql -u root

Create a database and user:

CREATE DATABASE wordpress;
CREATE USER 'wpuser'@'localhost' IDENTIFIED BY 'StrongPassword';
GRANT ALL PRIVILEGES ON wordpress.* TO 'wpuser'@'localhost';
FLUSH PRIVILEGES;
EXIT;

Step 3: Download and Configure WordPress

Rather than using the old Ubuntu APT package, which often lags behind and causes compatibility issues, we’ll install WordPress directly from WordPress.org — the official and most reliable source.
This method ensures you’re always on the latest stable release, compatible with modern PHP versions and supported by the global WordPress community.

Process 1: Create the Web Directory

We’ll create a dedicated directory for hosting WordPress files.
This guide uses /srv/www, which is a secure and clean location for web applications:

sudo mkdir -p /srv/www
sudo chown www-data: /srv/www

Here, the www-data user is the default web server user for both Nginx and PHP-FPM, ensuring the web application can serve and manage files correctly.

Process 2: Download and Extract WordPress

Use curl to fetch the latest version of WordPress directly from the official source, and extract it in one command:

curl https://wordpress.org/latest.tar.gz | sudo -u www-data tar zx -C /srv/www

This command:

After extraction, your directory structure should look like this:

/srv/www/wordpress/
├── wp-admin/
├── wp-content/
├── wp-includes/
├── index.php
└── wp-config.php

Update database info in /srv/www/wordpress/wp-config.php:

define( 'DB_NAME', 'wordpress' );
define( 'DB_USER', 'wpuser' );
define( 'DB_PASSWORD', 'StrongPassword' );
define( 'DB_HOST', 'localhost' );

Also Read,

OpenAI Sora Turbo: Text-to-Video Generation Features – Everything You Need to Know
Funny WiFi Names That Deserve Their Own Netflix Series (Hilarious Ideas You Can’t Miss!)
What Happens If the Internet Disappears Forever and Never Return Back
Will You Buy the New Tesla Phone Pi? Find Out Why!
200+ Best WhatsApp Group Names for Friends in 2025 – Funny, Stylish & Uniquely Yours
100+ Funny WiFi Names in India to Make Your Neighbors Smile in 2025
Best Python Programming and Coding Jokes in 2025


Step 4: Configure Nginx for WordPress

Create a new Nginx configuration file:

sudo nano /etc/nginx/sites-available/default

Paste the following:

server {
    listen 80;
    listen [::]:80;
    server_name demo.onlineread.com;

    root /srv/www/wordpress;
    index index.php index.html index.htm;

    location / {
        try_files $uri $uri/ /index.php?$args;
    }

    location ~ \.php$ {
        include snippets/fastcgi-php.conf;
        fastcgi_pass unix:/var/run/php/php8.3-fpm.sock;
    }

    location ~ /\. {
        deny all;
    }

    client_max_body_size 100M;
}

Enable and reload Nginx:


sudo systemctl reload nginx

Want to learning programming? Here is the beginner guide for you !


Step 5: Add SSL Using Cloudflare (Full Strict Mode)

Go to Cloudflare SSL/TLS → Origin Server

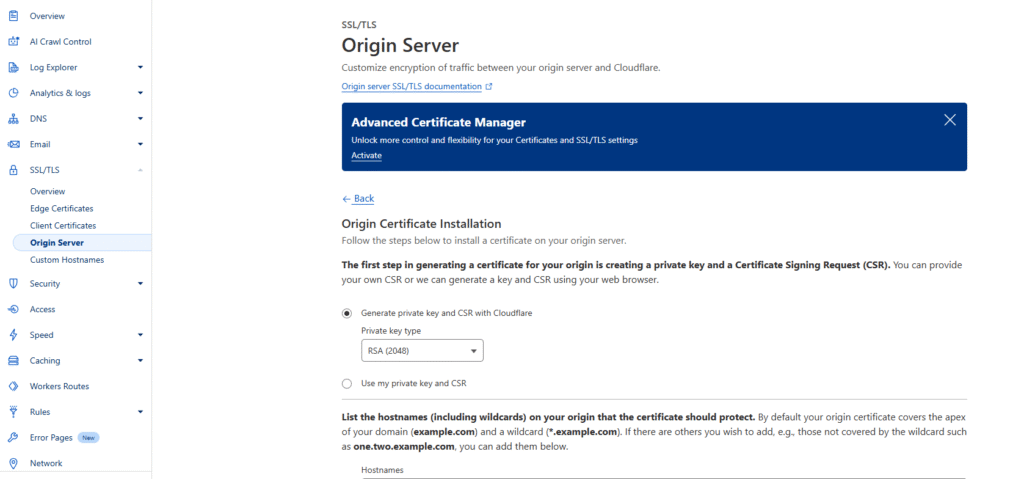
Click Create Certificate
→ Select Let Cloudflare generate the key and certificate
→ Choose your domain (e.g., example.com, www.example.com)
→ Download both .pem and .key files.

Upload them to your server:

sudo mkdir -p /srv/www/ssl
cd ssl
sudo nano cloudflare.key

Paste the key here (for cloudflare.key):

-----BEGIN PRIVATE KEY-----
MIIEvQIBADANBgkqhkiG9w0BAQEFAASCBKcwggSjAgEAAoIBAQD1+GPErsqV57/p
cNmvzauR3FEAgm4RhE4uCm4cnkMJhWVe3qNcpFjZF7jHuJlPiWKS/Jf1ffxlvI9s
AxsiGxxfrOH0aIsyz0QBLWxIjkuS0OKVSHnavvPp8p5O8gDzvdDP3HfT/aeqqGv9
YgPm4EWKlIBv6tEGjMgyWJ4EftsE+aJEItVVVzGeeak865LbkBa9on2iNQTdhuAZ
SprtDOH1YDv/FX1SGtciQ0QbpC9WbetWSYhDwBGhsh3uRFcCG7IXQmX9jDlBfssn
xYn4TpEIYSVRLfnxFcE/E49VNRtFadg36eEUkKT9Yaf+pm9f02J8Fziyi7rl0+ia
Sh0lFM8/AgMBAAECggEAN/eMu/QJpJJW2IcVASuLHmVDCRqkcNfp8g/tfhWEq2Xu
6uc9xJagoMUFBmy6dZ6ND2TqLrG7/GorOCh8xAXnLt3ni/U9txHyJ1JukRPPnlhp
Ng6Hq35HgbPy0YO/M7a9DI7dtR7CR9KKv9zNhnsBV8bycoS7iwH9i3cefWdf7oFs
eI5iVk7Fm8h0Vk/h3UrIEjg6s0tVyQl9KWdVYKOMAQMuEDYIwFI0hO4JAdygEaUC
mSyEKi3I9OHbrT/dU74mgiEk34dD0dxcaYB0380FuiTWoR29nbGLMkGqT3vj8HCr
Ky1sDlzk88eksWcwTZt87ikONxFT2p4QHzNKzq4iAQKBgQD7kUZngpAkwve5WjK/
CjEv+Qeu3sEEEjNe9vn8GWznnnECsh5YQm3GHLQCp3bPvmeYAPrLe/SLNFXt01G0
Y3enINs7uH3kpuMwervsdaferuiwherhweirhwejjksadf522dfsafsaqA/8IUfq
uNmSdpESyaukdAqHPVN69sVMRQKBgQD6Td4qLAdlH2LleBMOX2/W410O1yBYV2yr
HDHgnM+OCcOQ3WAxUAmMx3BAoa1XG8hzOiEvwXGmyx1G6zr3+49EFzulUGJTEund
KsxUR2oSirTYlUfUC92WF/XPc3NphUiA0ouqGP9GK+atFTMW+S1Faw1aGK1cAfWx
nbqU9mW/swKBgG5P+/Fz3UVhgUNz/ACttXf12Zqi7zybxo8D+gbEF29RmPi3pnrJ
Vl2jRIRNbtoWAlMzSsZj6o4IOw34tkFFxLgyvi/n7LyROeCGm5COr92DYE47G+gj
Ew0FRHxygUfWva6/FB3+Ql+YJLpI1cJloHKLL35vlKaeg+ddyveGsmmJAoGAOou2
GEUeIa/6sNOqGWWHQksB/DOjVCZ2u3sny3LCNWXhQWQWWNJwuWX4wpVOdx5/fzws
gQANNkcx/OGOdGx5sSKCCAPKS8YTv3CARIJDtDyPWk1odJel57KJA1Hsv9S2BbO5
iTq5ks838GoR/iCgTylgAR/ehLPMpRPQjYEogXMCgYEAgPZJ9aSQDNt0nOXtGnuz
3K+hDX1Uadtmfp5CjVDhZXvh1LW0LUr5wH+sadfsafdsafY9XsgDGTgyqNr7yDji
pg7ooMBlgufYviTkcuraj+z2o6qBw/7At23YU8sUOBNkzKcHtlw8m7rni3+fCQDN
oixdPgd7eUgKvdUTZhmPgxI=
-----END PRIVATE KEY-----

Again, go for another key (pem) file

sudo nano cloudflare.crt

Paste the key here (for cloudflare.crt) which is a pem file:

Upload them to your server:

sudo mkdir -p /srv/www/ssl
cd ssl
sudo nano cloudflare.key

Paste the key here (for cloudflare.key):

-----BEGIN PRIVATE KEY-----
MIIEvQIBADANBgkqhkiG9w0BAQEFAASCBKcwggSjAgEAAoIBAQD1+GPErsqV57/p
cNmvzauR3FEAgm4RhE4uCm4cnkMJhWVe3qNcpFjZF7jHuJlPiWKS/Jf1ffxlvI9s
AxsiGxxfrOH0aIsyz0QBLWxIjkuS0OKVSHnavvPp8p5O8gDzvdDP3HfT/aeqqGv9
YgPm4EWKlIBv6tEGjMgyWJ4EftsE+aJEItVVVzGeeak865LbkBa9on2iNQTdhuAZ
SprtDOH1YDv/FX1SGtciQ0QbpC9WbetWSYhDwBGhsh3uRFcCG7IXQmX9jDlBfssn
xYn4TpEIYSVRLfnxFcE/E49VNRtFadg36eEUkKT9Yaf+pm9f02J8Fziyi7rl0+ia
Sh0lFM8/AgMBsfsdfsdf5366s6dfsdf32IcVASuLHmVDCRqkcNfp8g/tfhWEq2Xu
6uc9xJagoMUFBmy6dZ6ND2TqLrG7/GorOCh8xAXnLt3ni/U9txHyJ1JukRPPnlhp
Ng6Hq35HgbPy0YO/M7a9DI7dtR7CR9KKv9zNhnsBV8bycoS7iwH9i3cefWdf7oFs
eI5iVk7Fm8h0Vk/h3UrIEjg6s0tVyQl9KWdVYKOMAQMuEDYIwFI0hO4JAdygEaUC
mSyEKisdfsadfsadf36625sdfsdaf333333333333sdfsdf9nbGLMkGqT3vj8HCr
Ky1sDlzk88eksWcwTZt87ikONxFT2p4QHzNKzq4iAQKBgQD7kUZngpAkwve5WjK/
CjEv+Qeu3sEEEjNe9vn8GWznnnECsh5YQm3GHLQCp3bPvmeYAPrLe/SLNFXt01G0
Y3enINs7uH3kpuMwervsdaferuiwherhweirhwejjksadf522dfsafsaqA/8IUfq
uNmSdpESyaukdAqHPVN69sVMRQKBgQD6Td4qLAdlH2LleBMOX2/W410O1yBYV2yr
HDHgnM+OCcOQ3WAxUAmMx3BAoa1XG8hzOiEvwXGmyx1G6zr3+49EFzulUGJTEund
KsxUR2oSirTYlUfUC92WF/XPc3NphUiA0ouqGP9GK+atFTMW+S1Faw1aGK1cAfWx
nbqU9mW/swKBgG5P+/Fz3UVhgUNz/ACttXf12Zqi7zybxo8D+gbEF29RmPi3pnrJ
Vl2jRIRNbtoWAlMzSsZj6o4IOw34tkFFxLgyvi/n7LyROeCGm5COr92DYE47G+gj
Ew0FRHxygUfWva6/FB3+Ql+YJLpI1cJloHKLL35vlKaeg+ddyveGsmmJAoGAOou2
GEUeIa/6sNOqGWWHQksB/DOjVCZ2u3sny3LCNWXhQWQWWNJwuWX4wpVOdx5/fzws
gQANNkcx/OGOdGx5sSKCCAPKS8YTv3CARIJDtDyPWk1odJel57KJA1Hsv9S2BbO5
iTq5ks838GoR/iCgTylgAR/ehLPMpRPQjYEogXMCgYEAgPZJ9aSQDNt0nOXtGnuz
3K+hDX1Uadtmfp5CjVDhZXvh1LW0LUr5wH+sadfsafdsafY9XsgDGTgyqNr7yDji
pg7ooMBlgufYviTkcuraj+z2o6qBw/7At23YU8sUOBNkzKcHtlw8m7rni3+fCQDN
oixdPgd7eUgKvdUTZhmPgxI=
-----END PRIVATE KEY-----

Then perform this operation which give permission

sudo chmod 600 /srv/www/ssl/*
sudo chown root:root /srv/www/ssl/*

Again, Update Nginx SSL configuration:

server {
    listen 80 default_server;
    listen [::]:80 default_server;
    server_name demo.onlineread.com;

    root /srv/www/wordpress;
    index index.php index.html index.htm;

    location / {
        try_files $uri $uri/ /index.php?$args;
    }

    location ~ \.php$ {
        include snippets/fastcgi-php.conf;
        fastcgi_split_path_info ^(.+\.php)(/.+)$;
        fastcgi_pass unix:/var/run/php/php8.3-fpm.sock;
    }

    location ~ /\. {
        deny all;
    }

    client_max_body_size 100M;
}

server {
    listen 443 ssl default_server;
    listen [::]:443 ssl default_server;
    server_name demo.onlineread.com;

    root /srv/www/wordpress;
    index index.php index.html index.htm;

    ssl_certificate     /srv/www/ssl/cloudflare.crt;
    ssl_certificate_key /srv/www/ssl/cloudflare.key;

    ssl_protocols TLSv1.2 TLSv1.3;
    ssl_prefer_server_ciphers off;

    location / {
        try_files $uri $uri/ /index.php?$args;
    }

    location ~ \.php$ {
        include snippets/fastcgi-php.conf;
        fastcgi_split_path_info ^(.+\.php)(/.+)$;
        fastcgi_pass unix:/var/run/php/php8.3-fpm.sock;
    }

    location ~ /\. {
        deny all;
    }

    client_max_body_size 100M;
}

Reload:

sudo nginx -t
sudo systemctl reload nginx

Important:

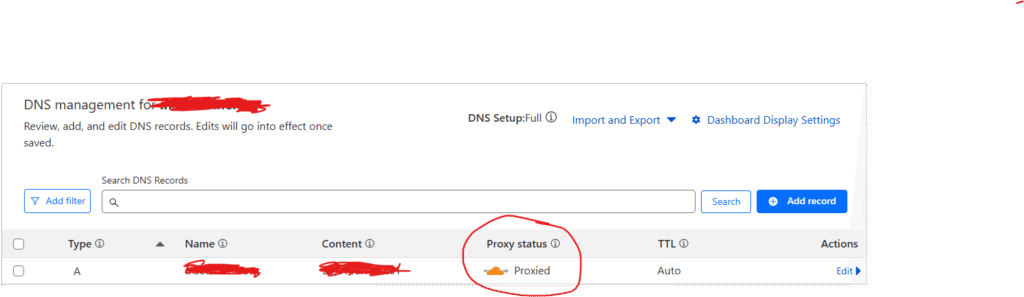
Ensure your Cloudflare DNS A record is Proxied (orange cloud).
If it’s “DNS only (grey cloud),” the browser will show invalid SSL certificate — because Cloudflare’s origin cert is trusted only between Cloudflare ↔ your VPS.

You’ve just learned how to host a WordPress site on your own VPS using Nginx, PHP, and Cloudflare SSL — the same setup used by top-performing websites.

This method gives you:

Now your WordPress site is production-ready, scalable, and fully secure. 🚀

Pro Tip: Updating Your WordPress Site URL When Moving to Production

If you’ve been developing your site under a demo domain like
👉 https://demo.onlineread.com
and now want to move it to your live production domain
👉 https://onlineread.com

you’ll need to update the WordPress URL settings inside your database — not just in Nginx or Cloudflare. Otherwise, your WordPress dashboard and pages may still redirect or load from the old demo domain.

Login to your mysql:

sudo mysql -u root -p

Then run (you have to find your database name and enter inside the table and then perform below command)

1) show databases;

Output:

+--------------------+
| Database           |
+--------------------+
| information_schema |
| mysql              |
| performance_schema |
| wordpress_db       |
+--------------------+

2) use wordpress_db;

3) show tables;

Output: 
+-----------------------+
| Tables_in_wordpress_db|
+-----------------------+
| wp_comments           |
| wp_options            |
| wp_posts              |
| wp_users              |
+-----------------------+

mysql> SELECT option_name, option_value FROM wp_options WHERE option_name = 'siteurl' OR option_name = 'home';

Output:
+-------------+-----------------------------+
| option_name | option_value                |
+-------------+-----------------------------+
| home        | https://demo.onlineread.com |
| siteurl     | https://demo.onlineread.com  |
+-------------+-----------------------------+
2 rows in set (0.00 sec)

Now, although you change your url to production in cloudflare and nginx, you still have to change it here manually

mysql> UPDATE wp_options SET option_value = 'https://onlineread.com' WHERE option_name = 'siteurl' OR option_name = 'home';

Output:
Query OK, 2 rows affected (0.00 sec)
Rows matched: 2  Changed: 2  Warnings: 0

Now, you have changed your domain from demo.onlineread.com (development) to onlineread.com (production). Note that you have to change the domain url in cloudflare DNS and in Nginx too.

Frequently Asked Questions

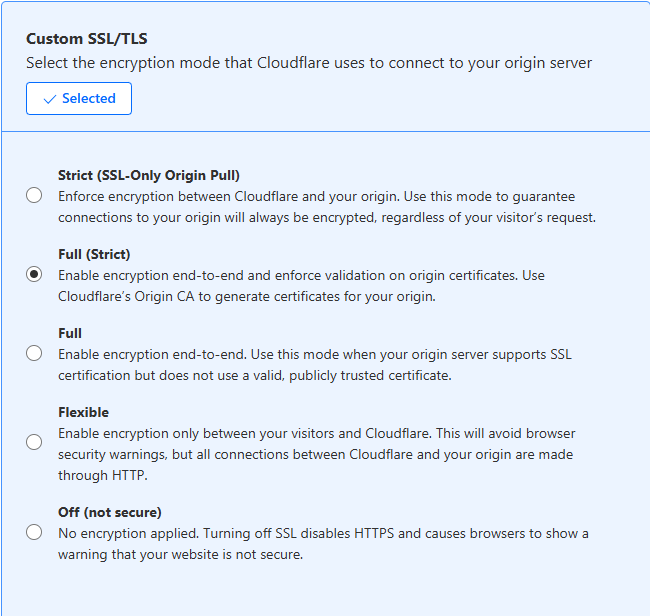
1. Do I need SSL on my VPS if I’m using Cloudflare?

Yes. Even if Cloudflare provides SSL, using your own certificate (Full or Full Strict mode) ensures end-to-end encryption between Cloudflare and your VPS.

2. How do I change my WordPress domain from demo to production?

Update your siteurl and home values in the wp_options table of your WordPress database. Also update your Nginx config and Cloudflare DNS.

3. What is the best way to secure a WordPress site on VPS?

Use Nginx with SSL, Cloudflare for CDN and firewall, disable XML-RPC, keep plugins updated, and restrict file permissions.

4. Why does my domain still point to the old site after changes?

This usually happens due to DNS or browser caching. Clear Cloudflare cache, browser cache, and confirm your A-record points to the correct VPS IP. Don’t forget to update at site url and home url in you database too.

Exit mobile version